I love all things starburst. So when I spotted this un-priced hamper at the estate sale where I picked up that great lampshade, I grabbed the hamper too.
As it turned out, the price was reasonable, so I brought it home.
The hamper is a 1970s green with a gold-ish tint, and it's in surprisingly good shape, so we've got it in our bedroom.
Showing posts with label starburst. Show all posts
Sunday, March 17, 2013
Sunday, August 19, 2012
Stuff I Picked Up at the World's Longest Yard Sale
I've been kinda inattentive to the old blog lately -- apologies that I haven't made progress on an mid-century projects. I actually have been working on my 1963 Mercury Comet station wagon, but the work has been on the front suspension and brakes, and that doesn't make for much of a blog post here, mainly because I'm nowhere near done. I've had to acquire a couple of special tools to help with removing rusted/stuck front brake drums and to take out the coil springs.
So anyway, I have owed you all some photos of the goodies I picked up during our first foray to the World's Longest Yard Sale. If you looked at my Flickr photo stream from the sale, you maybe got a feel for what was happening along Route 127 in parts of Tennessee and Kentucky.
I was a little disappointed on our first afternoon of the sale. Saw a lot of awful castoff junk and just a few gems here and there, and not much that I wanted to buy, but I didn't come away totally empty handed that day.
I scored these brown plastic letters all in a bunch. I'm guessing they date to the 1970s or 80s, but it's kinda hard to be certain.
These had threaded studs to attach to a wall. The capital letters are each about 12 inches tall.
I also bought this cool Vogue sewing pattern magazine pretty cheap.
The next day we had some rain in the morning, and we passed up a few places where most vendors had tarps thrown over everything. I couldn't help noticing that some vendors didn't bother to cover their stuff!
Finding this bunch of lunchboxes sitting on these shelves in puddles of water made me a little angry.
Now, I don't know about you, but it drives me nuts when I find something I want to buy, and I can't buy it because the seller is galavanting around somewhere! I found a couple record albums and these two perforated brass lamp diffusers at one wet stop we made, and the teenage boy who was left to mind the store had no idea what to price them at. "They'll be back soon," he said.
I waited about 10 minutes and then made two laps around the muddy field waiting for the vendor to come back. Finally I convinced the kid to take 2 bucks per album and six bucks for the two diffusers.
I don't think I can ever have enough lamp parts. I hope he didn't get a beating for selling the unpriced merch, which would probably still be in their possession if I hadn't pushed the issue.
Once the rain stopped, I had my best find of the day in a field full of junk.
These etched starburst glasses were not a complete set, but they were uber cheap and they seem to exactly match the tall glasses I found several years ago.
And this is the set that I already had. Pretty close match.
One thing I saw a TON of all along the route was glass of all kinds. I'm not big into glass, but I sure was happy to find these starburst glasses.
I don't collect soda bottles either, but I liked the look of this soda bottle marked Chattanooga, Tenn., so I bought it from the same guy who sold me the glassware.
Never heard of Ski soda before, but the seller said it was a citrusy soda comparable to 7-Up and Sprite (?)
I also found this metal letters and bills wall hanger thing on our second day.
It cleaned up pretty well for something that's probably 50 years old and may have sat in a barn for years. It had some dirt, light rust and cobwebs all over it, but the price was right.
Our third and last day of the sale was the best in terms of stuff I found, and most of it I got in one farm yard that had probably 100 vendors. A couple seemed to specialize in mid century and kitschy stuff - jackpot!
I'm not a big 1970s avocado/orange/harvest gold fan, but I do appreciate that others are, so I picked up this four-piece soft plastic canister set for a good price. I'll be adding it to my etsy store soon.
I also picked up probably about 25 more record albums, but I haven't shot pics of them yet. I know, I'm lame. I'll try to get that done soon.
Overall, we had a good time driving the back roads and hitting as many sales as we could. I'm not sure I would do it again, but maybe by July next year we'll be itching for a repeat.
So anyway, I have owed you all some photos of the goodies I picked up during our first foray to the World's Longest Yard Sale. If you looked at my Flickr photo stream from the sale, you maybe got a feel for what was happening along Route 127 in parts of Tennessee and Kentucky.
I was a little disappointed on our first afternoon of the sale. Saw a lot of awful castoff junk and just a few gems here and there, and not much that I wanted to buy, but I didn't come away totally empty handed that day.
I scored these brown plastic letters all in a bunch. I'm guessing they date to the 1970s or 80s, but it's kinda hard to be certain.
These had threaded studs to attach to a wall. The capital letters are each about 12 inches tall.
I also bought this cool Vogue sewing pattern magazine pretty cheap.
The next day we had some rain in the morning, and we passed up a few places where most vendors had tarps thrown over everything. I couldn't help noticing that some vendors didn't bother to cover their stuff!
Finding this bunch of lunchboxes sitting on these shelves in puddles of water made me a little angry.
Now, I don't know about you, but it drives me nuts when I find something I want to buy, and I can't buy it because the seller is galavanting around somewhere! I found a couple record albums and these two perforated brass lamp diffusers at one wet stop we made, and the teenage boy who was left to mind the store had no idea what to price them at. "They'll be back soon," he said.
I waited about 10 minutes and then made two laps around the muddy field waiting for the vendor to come back. Finally I convinced the kid to take 2 bucks per album and six bucks for the two diffusers.
I don't think I can ever have enough lamp parts. I hope he didn't get a beating for selling the unpriced merch, which would probably still be in their possession if I hadn't pushed the issue.
Once the rain stopped, I had my best find of the day in a field full of junk.
These etched starburst glasses were not a complete set, but they were uber cheap and they seem to exactly match the tall glasses I found several years ago.
And this is the set that I already had. Pretty close match.
One thing I saw a TON of all along the route was glass of all kinds. I'm not big into glass, but I sure was happy to find these starburst glasses.
I don't collect soda bottles either, but I liked the look of this soda bottle marked Chattanooga, Tenn., so I bought it from the same guy who sold me the glassware.
Never heard of Ski soda before, but the seller said it was a citrusy soda comparable to 7-Up and Sprite (?)
I also found this metal letters and bills wall hanger thing on our second day.
It cleaned up pretty well for something that's probably 50 years old and may have sat in a barn for years. It had some dirt, light rust and cobwebs all over it, but the price was right.
Our third and last day of the sale was the best in terms of stuff I found, and most of it I got in one farm yard that had probably 100 vendors. A couple seemed to specialize in mid century and kitschy stuff - jackpot!
I'm not a big 1970s avocado/orange/harvest gold fan, but I do appreciate that others are, so I picked up this four-piece soft plastic canister set for a good price. I'll be adding it to my etsy store soon.
Within a couple minutes of getting the canisters, I picked up this danish lamp.
The wood looks like it could use some refreshing, so this is going in the projects pile.
Eventually I'll disassemble it, shine up the brass, restore the wood and maybe give it a grounded electrical rewiring. The shade that came with it looks original, but it's kinda beat up. I'm not tossing the shade yet because I'm hoping I can figure out a way to remove the dents and get it looking decent. If not, I'll keep it until I can find a close replacement shade.
I was surprised that I didn't find a single tiki mug during the whole trip, but I did get a great buy on both these guys in the same farm field.
They look better than they did when I bought them, thanks to some tung oil.
Next, I just missed getting this great looking record player for $10. The buyer was marking sold on it when I walked up to it.
And the last thing I bought in that field (and the last purchase of the trip) was this chair --
it was a great deal, and fortunately I had brought some tools with me, so I was able to take it apart and fit it into our car top carrier. It's marked Yugoslavia, the rope is in great shape. I cleaned up the wood and gave it a coat of tung oil and it's looking good now.
Overall, we had a good time driving the back roads and hitting as many sales as we could. I'm not sure I would do it again, but maybe by July next year we'll be itching for a repeat.
Saturday, October 22, 2011
Project: Converting a vintage starburst wall clock to run on batteries
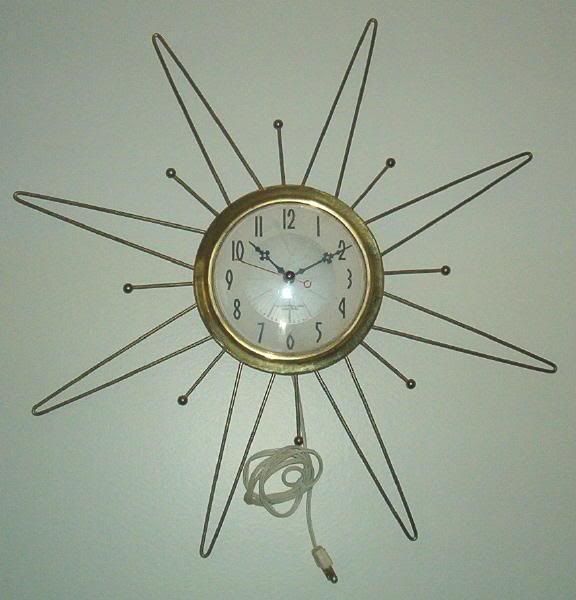
I've been planning this project for a while. It's a Canadian-made Westclox electric wall clock.
It's a very cool clock, but it has two features I don't like -- it was made to plug into an outlet, so you'll always see the ugly electrical cord when the clock is in use, and, the roman numeral face and antiquey hands that it came with seem out of place, so I'm going to switch those things.
I have another one of these clocks which I already converted, but it had a different face. It was my first battery conversion. Here's what the face looked like on that clock. The numbers are more of an art deco style, a little more suited to the clock frame. When I disassembled that first clock, I scanned this paper face and used Photoshop to get rid of the stains and blemishes. I also eliminated the middle design because it was too detailed to touch up and make it look like new, so instead I opted to insert an atomic symbol. I did things a little differently for this clock, as you'll see later on.
The back of the starburst clock has three tiny flathead screws which hold the black case and the clock mechanism together. Sorry, I forgot to get shots of the disassembly, but essentially you have to look for screws and metal tabs which are very likely holding the clock body and the case together. This clock had a stem in front on the outside of the plastic case for adjusting the time. Once I got the back of the clock off I had to use a pair of vice grip needle nose pliers to carefully pull the stem out. (You could also cut the base of the stem once the back of the clock is revealed. Either way, the stem had to be sacrificed to get the clock apart.)
My goal was to get the plastic face, the star frame, and the black metal rear case apart. At that point, I worked on removing the clear plastic face cover by squeezing it to release some tabs that fit into slots in the metal back. You can usually assume that the plastic face has some kind of tabs that need to be pinched or pryed to get the tabs out of the slots they're in. A little careful work and the plastic cover was off. I sat that aside and later used some plastic polish to shine it up before reassembly.
Here's the frame, the brass face frame, and the black back disassembled. I've already cut the hole in the black part for access to the battery, but this gives you an idea of what the clock parts look like.
For this project, I'm going to use the battery unit out of this red kitchen clock, a project I did a few years ago which didn't work out for various reasons.
The nice thing about these old clocks is they're usually similar enough that any of these small battery-powered replacements can be made to work in most any other clock, usually without any modifications.
I looked over the hands on the red clock to see how they come off. Usually the minute hand is held on by tiny threaded brass nut, as this one was. After using a small pair of needle nose pliers to get that nut off, I carefully pulled up on the minute hand until it slipped up and off. (You can also see a tiny pin in the center of the stem. If you wanted to and had the space you could fit this with a press-on second hand. I didn't have one I liked, so I only used the hour and minute hands.)
Next, the hour hand comes off. These are usually pressed onto the stem so there's no nut to unscrew to get the hour hand off.
Last, there's usually a hexagonal brass nut holding the stem against the face. A little effort with an adjustable wrench or needle nose pliers is enough to loosen the brass nut. All of the small loose parts go into a ziplock bag so they don't get lost. And now I have the battery unit for the starburst clock. (The red clock parts are going back on the shelf for a future re-try at making this clock work again.)
I'm going to use this flat metal base from the starburst clock to connect the new battery-powered stem to the back of the clock.
The metal legs will be kept and they're spaced nicely so the battery unit will fit in between the legs. You also can see one of the old electric gears still attached to the plate. Since it won't be in my way, I'm leaving the gear in place.
I did a test fit of the battery mechanism and I found that the center hole in the metal plate had to be enlarged so the stem would fit through the plate and the new paper face I was making for this clock. So I used a drill bit to carefully enlarge the hole in the plate.
With the hole widened, I fitted the battery unit to the metal plate and reattached the brass nut to hold the unit in place.
I haven't found any way around this next step -- as you saw above, I had to cut out a hole in the black metal back of the clock to make room for the battery mechanism so the battery could be changed without tearing the clock apart.
I used a Dremel tool with a circular cutoff blade to cut out enough metal to allow access to the battery compartment of the mechanism, but I left the mounting holes so I can still reattach the stainless steel plate to the back.
Here's the cut out I made with the Dremel saw. As you can see, the hole at the top right was kept so I had something to us to hang the clock on the wall when it's done. It's not a perfect cut, but no one will see it. I also used a file to knock down the sharp edges of the cut.
Now before putting it together, I needed the new paper face. For this clock, I decided I wanted some atomic style numbers, so I used the computer to draw a circle with the same circumference as the old face, and then I used Microsoft Powerpoint to add the numbers I wanted. These numbers are from a font called Crash Landing, which I added to my laptop last year. You can find this free font and many other wicked cool mid century fonts at Tack-O-Rama (it's one of the links in the Favorites section of this blog - check it out).
So, I wanted something unique for the face of the clock. I settled on this great Tiki Moai spaceman graphic I found on an old sci fi magazine while surfing the web last year. I did a little photoshopping to clean up the image and then I sized it to fit inside the numbers on the face. I love how it turned out.
After finding the center and making a hole for the battery mechanism to fit through, I was ready to put the clock back together!
I made sure I had all the little parts and did some test fitting to be sure I knew which way all the pieces went back together, and I had to do a little touch up work with the scissors to get the new face ready to use in the clock.
After I pressed on the minute hand I reattached the small brass nut that holds it in place.
Here you can see I've used the three holes that form a triangle to reattach the metal plate to the black metal back of the clock.
With the battery unit mounted to the metal plate and the metal plate screwed onto the black metal back, I was ready to put the paper face on the other side of the metal plate, down over the new paper face, and attach the hour hand by pressing it carefully onto the clock stem. Then the minute hand went on, followed by the brass nut to hold the minute hand in place.
Next I snapped the plastic face cover on. After that, all I had left was to attache the circular brass frame around the plastic face and bend over the three metal tabs to hold everything together against the starburst frame.
And here's the finished clock!
There were a lot of steps in this project, but don't be discouraged. Pick up some really dirt cheap battery powered clocks at the next yard sale or flea market you find, and practice tearing them apart. You'll soon see it's fairly easy to work on these.
By the way, a good source for clock hands and battery units is www.klockit.com - their prices are very reasonable. If you look over their ads you'll see that you have to consider how big the clock face is in order to pick hands that will fit and not look too small or out of place.
It's a very cool clock, but it has two features I don't like -- it was made to plug into an outlet, so you'll always see the ugly electrical cord when the clock is in use, and, the roman numeral face and antiquey hands that it came with seem out of place, so I'm going to switch those things.
I have another one of these clocks which I already converted, but it had a different face. It was my first battery conversion. Here's what the face looked like on that clock. The numbers are more of an art deco style, a little more suited to the clock frame. When I disassembled that first clock, I scanned this paper face and used Photoshop to get rid of the stains and blemishes. I also eliminated the middle design because it was too detailed to touch up and make it look like new, so instead I opted to insert an atomic symbol. I did things a little differently for this clock, as you'll see later on.
The back of the starburst clock has three tiny flathead screws which hold the black case and the clock mechanism together. Sorry, I forgot to get shots of the disassembly, but essentially you have to look for screws and metal tabs which are very likely holding the clock body and the case together. This clock had a stem in front on the outside of the plastic case for adjusting the time. Once I got the back of the clock off I had to use a pair of vice grip needle nose pliers to carefully pull the stem out. (You could also cut the base of the stem once the back of the clock is revealed. Either way, the stem had to be sacrificed to get the clock apart.)
My goal was to get the plastic face, the star frame, and the black metal rear case apart. At that point, I worked on removing the clear plastic face cover by squeezing it to release some tabs that fit into slots in the metal back. You can usually assume that the plastic face has some kind of tabs that need to be pinched or pryed to get the tabs out of the slots they're in. A little careful work and the plastic cover was off. I sat that aside and later used some plastic polish to shine it up before reassembly.
Here's the frame, the brass face frame, and the black back disassembled. I've already cut the hole in the black part for access to the battery, but this gives you an idea of what the clock parts look like.
For this project, I'm going to use the battery unit out of this red kitchen clock, a project I did a few years ago which didn't work out for various reasons.
The nice thing about these old clocks is they're usually similar enough that any of these small battery-powered replacements can be made to work in most any other clock, usually without any modifications.
I looked over the hands on the red clock to see how they come off. Usually the minute hand is held on by tiny threaded brass nut, as this one was. After using a small pair of needle nose pliers to get that nut off, I carefully pulled up on the minute hand until it slipped up and off. (You can also see a tiny pin in the center of the stem. If you wanted to and had the space you could fit this with a press-on second hand. I didn't have one I liked, so I only used the hour and minute hands.)
Next, the hour hand comes off. These are usually pressed onto the stem so there's no nut to unscrew to get the hour hand off.
Here you can see both hands removed, and the hex nut is the only thing
keeping me from pulling the battery unit from this red clock.
I'm going to use this flat metal base from the starburst clock to connect the new battery-powered stem to the back of the clock.
The metal legs will be kept and they're spaced nicely so the battery unit will fit in between the legs. You also can see one of the old electric gears still attached to the plate. Since it won't be in my way, I'm leaving the gear in place.
I did a test fit of the battery mechanism and I found that the center hole in the metal plate had to be enlarged so the stem would fit through the plate and the new paper face I was making for this clock. So I used a drill bit to carefully enlarge the hole in the plate.
With the hole widened, I fitted the battery unit to the metal plate and reattached the brass nut to hold the unit in place.
I haven't found any way around this next step -- as you saw above, I had to cut out a hole in the black metal back of the clock to make room for the battery mechanism so the battery could be changed without tearing the clock apart.
I used a Dremel tool with a circular cutoff blade to cut out enough metal to allow access to the battery compartment of the mechanism, but I left the mounting holes so I can still reattach the stainless steel plate to the back.
Here's the cut out I made with the Dremel saw. As you can see, the hole at the top right was kept so I had something to us to hang the clock on the wall when it's done. It's not a perfect cut, but no one will see it. I also used a file to knock down the sharp edges of the cut.
Now before putting it together, I needed the new paper face. For this clock, I decided I wanted some atomic style numbers, so I used the computer to draw a circle with the same circumference as the old face, and then I used Microsoft Powerpoint to add the numbers I wanted. These numbers are from a font called Crash Landing, which I added to my laptop last year. You can find this free font and many other wicked cool mid century fonts at Tack-O-Rama (it's one of the links in the Favorites section of this blog - check it out).
So, I wanted something unique for the face of the clock. I settled on this great Tiki Moai spaceman graphic I found on an old sci fi magazine while surfing the web last year. I did a little photoshopping to clean up the image and then I sized it to fit inside the numbers on the face. I love how it turned out.
After finding the center and making a hole for the battery mechanism to fit through, I was ready to put the clock back together!
Here you can see the battery unit is already
attached to the metal plate with a brass nut.
I made sure I had all the little parts and did some test fitting to be sure I knew which way all the pieces went back together, and I had to do a little touch up work with the scissors to get the new face ready to use in the clock.
Here you can see I've used the three holes that form a triangle to reattach the metal plate to the black metal back of the clock.
With the battery unit mounted to the metal plate and the metal plate screwed onto the black metal back, I was ready to put the paper face on the other side of the metal plate, down over the new paper face, and attach the hour hand by pressing it carefully onto the clock stem. Then the minute hand went on, followed by the brass nut to hold the minute hand in place.
Next I snapped the plastic face cover on. After that, all I had left was to attache the circular brass frame around the plastic face and bend over the three metal tabs to hold everything together against the starburst frame.
And here's the finished clock!
No more ugly electrical cord or roman numerals!
There were a lot of steps in this project, but don't be discouraged. Pick up some really dirt cheap battery powered clocks at the next yard sale or flea market you find, and practice tearing them apart. You'll soon see it's fairly easy to work on these.
By the way, a good source for clock hands and battery units is www.klockit.com - their prices are very reasonable. If you look over their ads you'll see that you have to consider how big the clock face is in order to pick hands that will fit and not look too small or out of place.
Subscribe to:
Posts (Atom)