
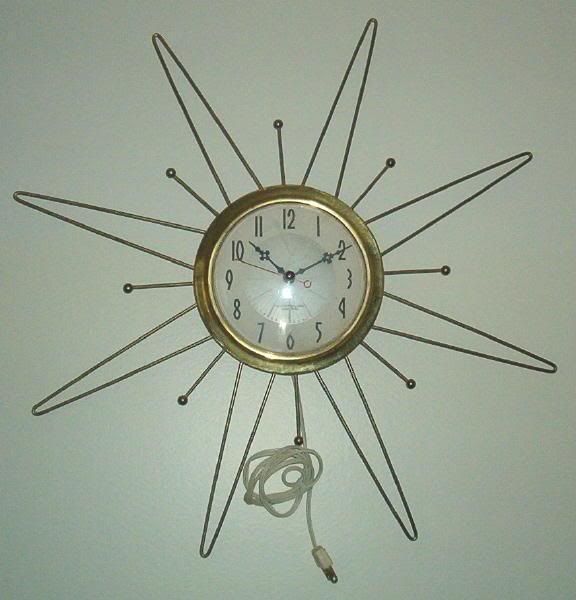

It's a very cool clock, but it has two features I don't like -- it was made to plug into an outlet, so you'll always see the ugly electrical cord when the clock is in use, and, the roman numeral face and antiquey hands that it came with seem out of place, so I'm going to switch those things.
I have another one of these clocks which I already converted, but it had a different face. It was my first battery conversion. Here's what the face looked like on that clock. The numbers are more of an art deco style, a little more suited to the clock frame. When I disassembled that first clock, I scanned this paper face and used Photoshop to get rid of the stains and blemishes. I also eliminated the middle design because it was too detailed to touch up and make it look like new, so instead I opted to insert an atomic symbol. I did things a little differently for this clock, as you'll see later on.

The back of the starburst clock has three tiny flathead screws which hold the black case and the clock mechanism together. Sorry, I forgot to get shots of the disassembly, but essentially you have to look for screws and metal tabs which are very likely holding the clock body and the case together. This clock had a stem in front on the outside of the plastic case for adjusting the time. Once I got the back of the clock off I had to use a pair of vice grip needle nose pliers to carefully pull the stem out. (You could also cut the base of the stem once the back of the clock is revealed. Either way, the stem had to be sacrificed to get the clock apart.)
My goal was to get the plastic face, the star frame, and the black metal rear case apart. At that point, I worked on removing the clear plastic face cover by squeezing it to release some tabs that fit into slots in the metal back. You can usually assume that the plastic face has some kind of tabs that need to be pinched or pryed to get the tabs out of the slots they're in. A little careful work and the plastic cover was off. I sat that aside and later used some plastic polish to shine it up before reassembly.

Here's the frame, the brass face frame, and the black back disassembled. I've already cut the hole in the black part for access to the battery, but this gives you an idea of what the clock parts look like.

For this project, I'm going to use the battery unit out of this red kitchen clock, a project I did a few years ago which didn't work out for various reasons.

The nice thing about these old clocks is they're usually similar enough that any of these small battery-powered replacements can be made to work in most any other clock, usually without any modifications.
I looked over the hands on the red clock to see how they come off. Usually the minute hand is held on by tiny threaded brass nut, as this one was. After using a small pair of needle nose pliers to get that nut off, I carefully pulled up on the minute hand until it slipped up and off. (You can also see a tiny pin in the center of the stem. If you wanted to and had the space you could fit this with a press-on second hand. I didn't have one I liked, so I only used the hour and minute hands.)

Next, the hour hand comes off. These are usually pressed onto the stem so there's no nut to unscrew to get the hour hand off.

Here you can see both hands removed, and the hex nut is the only thing
keeping me from pulling the battery unit from this red clock.

I'm going to use this flat metal base from the starburst clock to connect the new battery-powered stem to the back of the clock.

The metal legs will be kept and they're spaced nicely so the battery unit will fit in between the legs. You also can see one of the old electric gears still attached to the plate. Since it won't be in my way, I'm leaving the gear in place.

I did a test fit of the battery mechanism and I found that the center hole in the metal plate had to be enlarged so the stem would fit through the plate and the new paper face I was making for this clock. So I used a drill bit to carefully enlarge the hole in the plate.
With the hole widened, I fitted the battery unit to the metal plate and reattached the brass nut to hold the unit in place.
I haven't found any way around this next step -- as you saw above, I had to cut out a hole in the black metal back of the clock to make room for the battery mechanism so the battery could be changed without tearing the clock apart.

I used a Dremel tool with a circular cutoff blade to cut out enough metal to allow access to the battery compartment of the mechanism, but I left the mounting holes so I can still reattach the stainless steel plate to the back.
Here's the cut out I made with the Dremel saw. As you can see, the hole at the top right was kept so I had something to us to hang the clock on the wall when it's done. It's not a perfect cut, but no one will see it. I also used a file to knock down the sharp edges of the cut.

Now before putting it together, I needed the new paper face. For this clock, I decided I wanted some atomic style numbers, so I used the computer to draw a circle with the same circumference as the old face, and then I used Microsoft Powerpoint to add the numbers I wanted. These numbers are from a font called Crash Landing, which I added to my laptop last year. You can find this free font and many other wicked cool mid century fonts at Tack-O-Rama (it's one of the links in the Favorites section of this blog - check it out).
So, I wanted something unique for the face of the clock. I settled on this great Tiki Moai spaceman graphic I found on an old sci fi magazine while surfing the web last year. I did a little photoshopping to clean up the image and then I sized it to fit inside the numbers on the face. I love how it turned out.

After finding the center and making a hole for the battery mechanism to fit through, I was ready to put the clock back together!

Here you can see the battery unit is already
attached to the metal plate with a brass nut.
I made sure I had all the little parts and did some test fitting to be sure I knew which way all the pieces went back together, and I had to do a little touch up work with the scissors to get the new face ready to use in the clock.


With the battery unit mounted to the metal plate and the metal plate screwed onto the black metal back, I was ready to put the paper face on the other side of the metal plate, down over the new paper face, and attach the hour hand by pressing it carefully onto the clock stem. Then the minute hand went on, followed by the brass nut to hold the minute hand in place.

Next I snapped the plastic face cover on. After that, all I had left was to attache the circular brass frame around the plastic face and bend over the three metal tabs to hold everything together against the starburst frame.

And here's the finished clock!


No more ugly electrical cord or roman numerals!
There were a lot of steps in this project, but don't be discouraged. Pick up some really dirt cheap battery powered clocks at the next yard sale or flea market you find, and practice tearing them apart. You'll soon see it's fairly easy to work on these.
By the way, a good source for clock hands and battery units is www.klockit.com - their prices are very reasonable. If you look over their ads you'll see that you have to consider how big the clock face is in order to pick hands that will fit and not look too small or out of place.
WOWWEEEEEE! That turned out so dang good! I love how you not only upgraded it, you personalized it! The space traveling tiki heads are amazing. A+++
ReplyDeleteGreat job!!! I can't believe how awesome it looks now! Ah-maz-ing!!!!
ReplyDeleteThank you ladies, I'm glad you like it!
ReplyDelete