
Here's the project from start to finish.
I've been looking for one of these life-size Douglas Fir Plywood Santa patterns, and I finally found one on ebay at a good price in August.(Hint: don't try to buy one of these between late November and Christmas time, you can find them in the off season and save significant money. The santa pattern has sold for more than $100 in late November.
These patterns, and similar ones featuring reindeer, a sleigh, a choir, and a nativity scene, were offered by a group that promoted the sale of Douglas Fir Plywood. You glue the paper pattern to outdoor plywood then seal it and cut it out with a jigsaw.
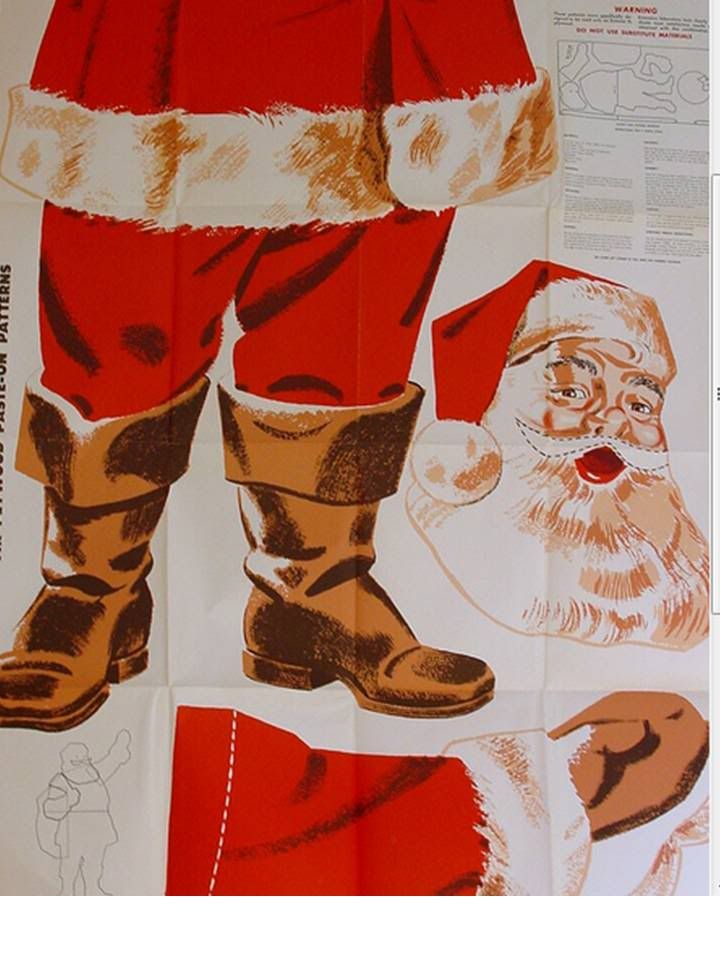

In August I picked up a 55-year old Douglas Fir Plywood Santa pattern that you glue to plywood, cut out and assemble to make an outdoor Santa. He looks something like the old Santa in the Coca Cola ads of the 1950s and 60s.
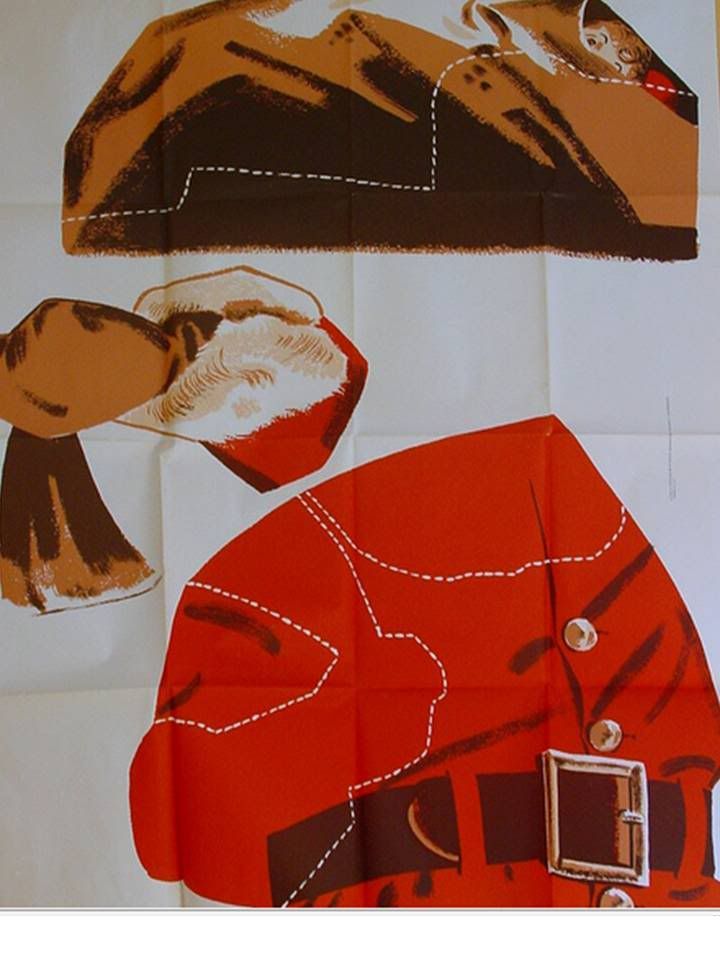
Here's my cheat sheet to tell me how and where to attach the pieces when it's ready to assemble. Two arms, the head, a bag o' toys, and a mustache have to be attached.

I put off buying the plywood until I got the correct glue to use with the paper pattern. I ended up finding this stuff through Amazon.

To get started, I bought a sheet of half-inch treated plywood to use as the backing (the big box stores don't usually have doug fir plywood, so I substituted with the treated plywood). First I got out the sawhorses and used some leftover white stain on what will be the back of the Santa. I did this to make the back more presentable when it's finished.
The stain drys quickly, so after about 90 minutes I flipped the plywood over and used my belt sander with 120 grit paper to smooth out the surface I wanted to glue the paper onto. I used compressed air to blow the sawdust off and then moved the sawhorses and plywood into the basement for gluing.

The glue comes in a powder that you mix with warm water. I guessed on the amount, and ended up with a good bit left over. Unfortunately, once it's mixed it won't keep for use some other time. But, better to have too much than run out in the middle of the gluing process.
I cut out the Santa pattern pieces, then laid them out on the plywood and traced around them quickly with a pencil. I think this was a smart move, because it allowed me to spread the glue onto the plywood only where I needed it. I also rolled glue onto the back of each piece in turn, then pressed it down onto the wood.
It's always good to have all your materials and tools ready before you start. I don't always remember everything, and this time was no exception. I had a small paint roller for spreading the glue, but after I pasted down the main two-piece Santa body, I realized I needed a clean roller to smooth out the paper and get it to make better contact with the plywood. I was lucky I had another small paint roller nearby and used that along with a clean paint stirring stick. I also ended up using a small paint brush to get glue under a few edges that didn't get enough glue from the roller. It all went together reasonably well, considering this 1956 pattern was folded for at least 50 years, so I couldn't get all the creases out even with using the roller. But hey, we'll just pretend this Santa has seen a lot of snow and cold, and we'll say he's held up pretty good!

After the glue set up and the pattern was stuck to the plywood, I moved Santa outside and sprayed a couple coats of clearcoat over the paper parts. Then I used the jigsaw to cut out the pieces.
After some careful cutting and sanding the edges, I brushed a little white stain along his edges.
I followed the directions and attached the plywood pieces with screws and some wood glue. I used wood clamps to keep the pieces tight together and let the glue set up some, then I made sure that the screws were short enough so they wouldn't go all the way through the two or three pieces of wood that needed to be joined together.
Caution: Don't overdo the glue, or it will run. I had to check on the clamped pieces and use a damp cloth the first hour after I glued to wipe off dripped glue before it set up and hardened in place.
Before the glue was set, I carefully modified some one-inch deck screws using a pair of bolt cutters to nip off enough of the ends to make them shorter. Two pieces of the plywood together were only about 7/8 of an inch, so I had to make the screws just short enough so they wouldn't go all the way through the wood and mess up the project.

I had a piece of 1/2 inch conduit pipe that I found nicely fits over a long piece of rebar, so I cut it, drilled a couple of holes, and screwed it into the thickest part where three layers of plywood come together.

To finish things off, I got a step ladder and a mini sledge hammer and drove a long piece of rebar into the ground where I wanted Santa to stand in the yard.


Once the glue set up, I used some white outdoor caulk to seal between the edges of the pieces of plywood that are glued/screwed together. This was done to minimize the amount of rain, snow, and ice that gets in there. After all, I'd like this Santa to last for a while through a mix of bad weather conditions.

When I had Santa ready to set up, I took him out front and found a spot to place him. Then I used a piece of 8-foot rebar and eyeballed how much to cut off of the rebar to have enough to put about 30 inches deep into the ground and have the bar reach well into the pipe I attached to the back of Santa. Then I cut the piece of rebar to the right length, and painted it white to make it blend in with the white back of Santa. I used a mini sledgehammer, about the size of a regular hammer but with a heavy head. Drove that rebar into the ground about 30 inches, and it was tough going. I felt like I had one Popeye arm after all that work. Anyway, as I hammered the rebar the top of the bar was flattening out and becoming wider. I was a little worried that it would be too wide to still fit inside the pipe I attached to the back of Santa. Fortunately, the mini sledgehammer persuaded the pipe to slide down over the rebar.
Here's what I learned from this project:
- If you want to work with treated plywood, buy it and let it sit flat to dry out for a couple of weeks - I was too hasty, and I think the wood shrunk and bowed a little as the treated chemicals in the wood dried out.
- Have plenty of clamps to hold the pieces together after you apply the wood glue - with the piece glued and clamped, you can then screw the pieces together to hold better. I left the clamps on until the glue dried.
- If you have the Santa standing up while the glue dries, watch for glue running down the front - if you catch the runs before they dry, they'll wipe off with a wet cloth.
- Don't expect to have the pattern glue down perfectly to the wood - despite my best efforts, I have some wrinkles and areas where air pockets puffed out the applique a little.
- In high winds, like we experienced the days after Christmas 2010, the wind can bend the rebar (and Santa) pretty easily - I need to try and figure out a way to strengthen Santa's chances of remaining upright!
Overall, this was a fun project, not too difficult, but you do need enough space to work in, the right tools, and you have to be fairly good with a jigsaw or sabersaw.